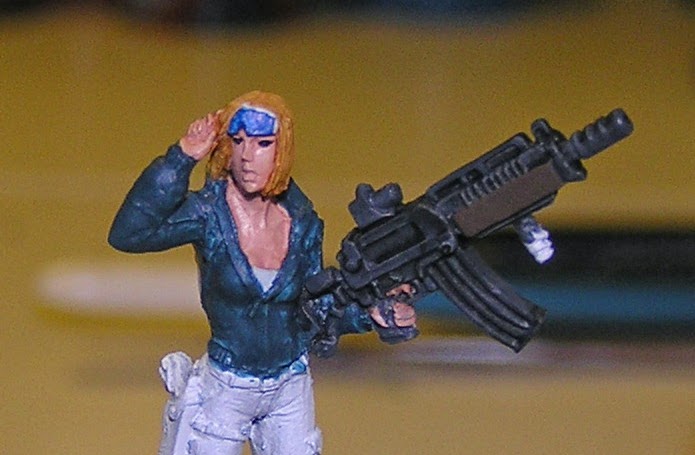
A while back, 4apples on the infinity forums asked me how I did my skin and the metal on guns. I gave him a quick rundown and promised a quick step-by-step after I found the female metro in a deplorable state. I had to strip her and start over, she got knocked around a bit during transport and she was only half done anyway.
Luckily, she's got a nice area of skin right next to the rifle, so I was able to do both at the same time and only had to grab the same pics.
For starters, she got undercoated with GW spray white, as I much prefer having something bright to work from, at least with models as detailed as CB ones. All paints are Vallejo Model Colour unless otherwise noted. GW should be obvious as an abbreviation, VGC is Vallejo Game Colour while VMA is Vallejo Model Air. Most mixes are thinned with a mix of water and Vallejo thinner.
Step 1:

Skin:
Her skin got a basecoat of Brown Sand and Salmon Rose in a 70/30 mix. Brown Sand is my usual skin base colour, and I tend to mix in a bit of the highlight colour to accent it and make the blends easier. The highlight colour varies depending on what I'm going for. This time, I went for Salmon Rose, since I wanted a bright, pinkish tone to accent the gun and the blue jacket, but I've used Flat Flesh, Basic Skintone or GWs Kislev Flesh or Cadian Flesh as well, or a mix with English Uniform for a more southern-european kinda tone.
Gun:
For guns, I tend to start with a mix of Dark Sea Green (VMA) and Heavy Charcoal (VGC). The Dark Sea Green is a nice colour to work with as the slight green tint makes it more interesting, and the Heavy Charcoal is good for darkening it up and providing some heft - VMA paints are quite thin. The mix was about 80 Dark Sea Green/20 Heavy Charcoal, I think.
For both basecoats I went over the model 2 or 3 times, to get a proper covering layer with thinned paint.
Also, I painted her jacket, hair and glasses. They're adjacent to the skin, and I wanted them basecoated so I didn't mess the skin up later. Normally, I'll do all of the basecoating at the same time, to avoid this, but here I got lazy and only did the adjacent areas.
Step 2:
Skin:
First, the eyes got painted black, while correcting it would still be easy. Then, the skin got a wash all over with GW Reikland Fleshshade, thinned 50/50 with water. Went back over the recesses and gave them a bit more, to shade. Use it sparingly, as always.
Gun:
Blacklined with GWs black, then thinned it with about 30% water, 30% Vallejo thinner, 40% black and shaded the gun. I place the shadows towards the upper end of the elements - it's probably most visible on the body of the gun, right above the magazine. Placing the shadows takes some getting used to, but eventually it sorta makes sense.
Step 3:

Skin:
First highlights, a mix of Brown Sand and Salmon Rose again, this time in a 15/85 mix respectively.Gun:
Blended the black shading into the basecoat by going over the transitions with pure Dark Sea Green. I like the Air paints for blending since they're already thin and the pigments are very fine. After this I went back over the edges and lined them with the same paint. The black shading towards the top should be more visible here, btw.Step 4:

Skin:
Next highlight is the previous mix with 50% Ivory in.Gun:
This step is a 50/50 mix of Dark Sea Green and Pale Blue. I tend to use Pale Blue for guns, since the bluish undertones gives a good steel-ish look, plus it fits with the blue theme on my Ariadna and makes sure the warm tones on her skin and the contrast-bits stand out more. It gets blended into the down-wards facing highlights and on most of the edges.Step 5:

Skin:
Same procedure, I just added a bit more Ivory to the mix for the very highest highlights. Fingers, tip of her nose, her underlip, stuff like that where pushing the contrast helps a bit. Did her eyes too, by adding a dap of Ivory in the corner.Gun:
Exact same concept as the skin, added a bit more Pale Blue, did the edges and blended the highest highlights on the metal.Step 6:

Skin:
Final touches! I gave her lower lip a bit of red wash, the GW one that I can't remember the name of, deepened a few shadows with some thinned Reikland Fleshshade and called it a day. If the model had been a bit more of a display-quality one, I'd probs have given her a bit of red on her cheeks and possibly some blue or purple above her eyes, but frankly, I didn't bother since I'm not THAT into this sculpt.It's mainly useful to add some contrast to the skin anyhow, but here I'm using the skin to contrast the blue jacket and bluish steel of the gun and I don't want to dilute the effect.
Gun:
Final highlights to give a bit of a sheen is done by adding a touch of white to the previous mix. I used Dead White from Vallejo.That's about it, everything else I do with skin and metals basically follow this recipe with some modifications.
If any of you have any comments or ideas for stuff that could be done differently, I'd love to hear them!
Very very nice tutorial sir, I will most certainly be giving it a crack especially the way you paint the gun :)
ReplyDeleteThanks for this man! Gun looks SOO good!. Never thought about painting eyes, bye putting white in last. When she is looking left like that, it would also be easier not making here look grossed eyed!
ReplyDeleteThe Pale blue, is that VMA 71.046?
Cheers guys!
ReplyDeleteDaniel, no worries! The Pale Blue is VMC 70906, not a VMA paint. And yeah, I saw Angel do that with the eyes a while back, really makes sense.